even er vanuit gaan dat je een k-serie motor hebt.......
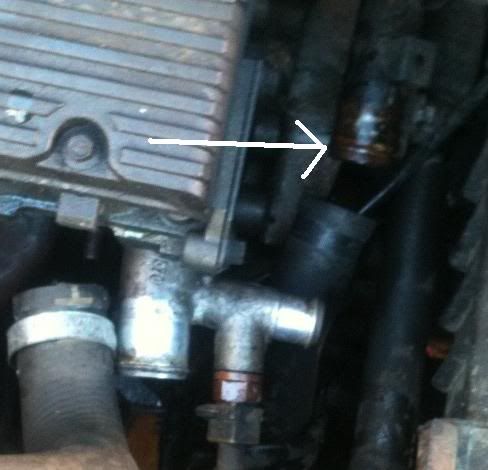
Achter op je blok onder je luchtinlaatapruitstuk loopt een buis, aan het einde van die buis zit hij ( bijrijderskant vd auto )
thermostaat 416 si 1997
Re: thermostaat 416 si 1997
Rover 25 vi 2001


-
Dr Doggystyle

- Beheerder
- Berichten: 26466
- Lid geworden op: vr feb 06, 2004 3:29 pm
- Woonplaats: het MG-R Forum
Re: thermostaat 416 si 1997
misschien heb je hier wat aan :
bron : http://forums.mg-rover.org/showthread.php?t=389745" onclick="window.open(this.href);return false;
bron : http://forums.mg-rover.org/showthread.php?t=389745" onclick="window.open(this.href);return false;
Note: This guide is done from my 400, so may differ in other models. the basics should be the same though.
I only got a couple of pictures, so have found a few pictures from the Internet for reference.
You will need:
- Replacement thermostat. Halfords do a Quinton Hazell one with the needed seal for just £6, or £4 with a Trade Card.
- Selection of sockets, namely 6mm for jubilee clips (some out of reach, so best got with a 6mm socket) 8mm and 10mm.
- Set of 'wobble' extension bars, to allow flexible access. My local Machine Mart does a great set, that includes 5 different lengths from about 40mm upto well over 300mm. Cost me about £8.
- Rachet to suit, ideally I'd stick to 1/4" products to ease access.
- You may wish to order new sealing rings for either side of the thermostat housing. These are available from Rimmer Bros, under code CDU3858. You will need to order 2.
Most guides I've found state this job is easier when done from under the car, however I managed perfectly fine thanks to the 'wobble' extension bars, working entirely from on top. I don't exactly have small hands either
If you have coolant loss, it may be worth whipping the Inlet Manifold off too, this is quite a simple job and will add about 30-60 minutes on to the job, including time for cleaning the port surfaces to ensure a good seal. Thread for replacement here: http://forums.mg-rover.org/showthread.php?t=213626
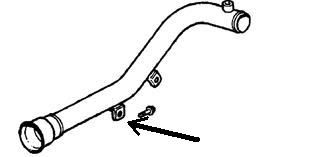
1. Remove the hose connecting the bottom of the radiator to the rear coolant rail, as indicated below.
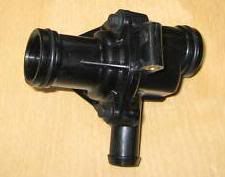
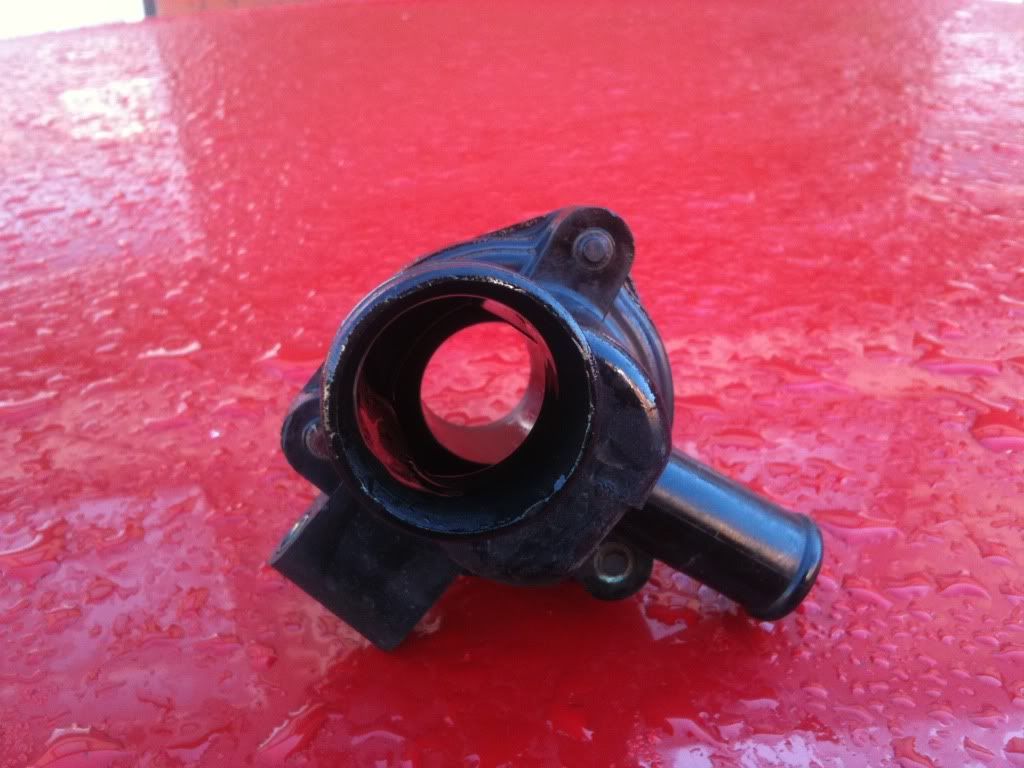
2. Locate the thermostat housing, under the inlet manifold at the end of the rear coolant rail.
Remove the hose connected to the side of the housing.
3. On the rear coolant rail, you may have an electrical connector mounted via clip to the rail itself. If so, you need to detatch this from the rail completely.
4. Remove the mounting bolt holding the rear coolant rail to the engine block, as indicated below.
5. Pull the rear coolant rail away from the thermostat housing. It may require a little force, it is sealed with an O-ring.
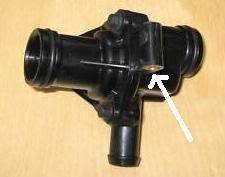
6. Remove the bolt holding the thermostat housing to the block. This is located along the top of the housing, as indicated here:
7. Now you can remove the housing, it is sealed with an O-ring into the block so may require a little force.
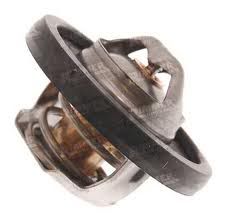
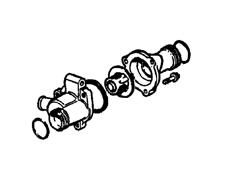
8. The housing is held together by 3 bolts. Remove these, and simply pull the housing into 2 parts. A lot of the time, garages that attempted to 'rectify' overheating issues have removed the thermostat altogether, as in my case!
9. Fit the seal supplied with your new thermostat to the outer edge, as below:
10. Replace the knackered / non-existant old thermostat with the new one, making sure it's facing the right way. This diagram is useful for making sure:
11. Replace the O-rings on either side of the assembly, if you ordered new ones. If not, make sure the rings are clear of any dirt, with no damage.
12. Check the end of the rear coolant rail at the point it meets the thermostat housing for dirt or corrosion, and clean up if needed. Also check the port in the block the thermostat housing connects to for dirt, and clean if needed.
13. Replace everything as it was removed, making sure all jubilee clips are tight to avoid coolant leaks.
14. You will have lost quite a lot of coolant, so make sure the engine is bled properly upon refilling. Switch the heaters to Hot, and slowly fill the header tank up.
15. Remove the bleed screw on the rear coolant rail, and allow any air to escape. When no more bubbles appear, replace the screw.
16. Top up the header tank if needed, and squeeze the radiator top hose several times to help disperse any air caught there.
17. Start the engine, and continue to squeeze the top hose to displace any air bubbles that make their way there.
18. After 1-2 minutes, you should feel warm air entering the cabin from the heaters. If they remain cold, then you will need to repeat the bleed process. Patience is the key!
Hope this has been useful.

LEF MG ZS180 06-05-23-nu
PBT MG ZS120 26-02-22-nu
IAP Rover 75 Tourer MK2 V6 11-8-21-nu
JBR Rover 45 MK1 V6 4-10-2020 tot 9-5-21 99-GP-GT
LVD Rover 400 Tourer 2018 tot 11-8-21 LZ-PS-02 RIP
PBT Rover 45 MK2 2011- 2017 03-PG-GN RIP
LQW Rover 200Vi 2010-2012 67-DG-VJ
LVD Rover 416si 2003-2011 RV-FN-98 RIP
Facebook MG-R.nl ! https://www.facebook.com/groups/MGRoverClubNederland